


Thyristors Online | High-Quality Power Semiconductors

Spark Your Circuits Right: Thyristor Discs Demystified & Installed .
(How To Install Thyristor Disc Type)
So you’ve got a thyristor disc resting on your bench. It looks easy sufficient, just a steel puck with some leads. However this little giant controls significant electrical muscle. Obtaining it mounted correctly is the distinction between smooth operation and, well, triggers flying where they shouldn’t. Allow’s break down whatever you require to learn about thyristor discs, from what they are to exactly how to fit them perfectly.
1. What Exactly Is a Thyristor Disc? .
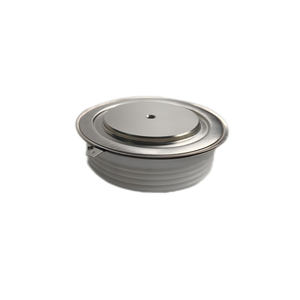
Think about a thyristor disc as a super-precise digital switch for high-power electrical energy. Unlike a normal button you turn by hand, this set obtains turned on and off by tiny electrical signals sent to its “gate” terminal. Once it’s activated, it allows existing circulation openly in one direction. Crucially, it remains on till the existing flowing through it drops to nearly absolutely no. You can’t just turn it off with the gate signal alone; it requires that natural present dip to reset. This makes it ideal for regulating a/c power or taking care of rises in DC circuits. The “disc” component? That’s its physical form– a level, round plan designed to screw onto a warm sink. This shape provides it a big surface to efficiently unload warmth created during operation, which is vital due to the fact that warm is its opponent.
2. Why Appropriate Installation Matters A Lot .
Ignoring the installation details isn’t a choice. These elements deal with high currents and voltages. A careless set up leads straight to failure. Heat is the greatest killer. If the disc can’t transfer heat properly to its heat sink, it overheats internally. This creates thermal runaway– the hotter it obtains, the even worse it carries out, making it even hotter, till it thaws down amazingly. Electrical links are essential also. Loosened installing or inadequate electric calls develop high-resistance areas. These areas get hot, potentially harming the disc or its links. They can likewise cause arcing, which threatens and devastating. Resonance is an additional enemy. In machinery or vehicles, continuous trembling can loosen up screws and connections gradually, bring about recurring mistakes or sudden failures. Appropriate installation locks everything down firmly versus warm, electrical troubles, and resonance.
3. Exactly how To Install Your Thyristor Disc Correctly (Step-by-Step) .
Safety and security first! Ensure all power is entirely detached and locked out. Verify the circuit is dead using a trusted meter. Collect your tools: the thyristor disc, the appropriate heat sink (clean!), thermal interface product (thermal paste or pad), appropriate mounting equipment (bolts, washing machines, nuts– usually supplied), and devices like a torque wrench. Currently, adhere to these actions thoroughly:.
1. Tidy Surfaces Thoroughly: Both the back of the thyristor disc and the mounting surface of the warmth sink have to be spick-and-span and completely flat. Use isopropyl alcohol and a lint-free towel. Even tiny bits of dust or old thermal paste act as insulation, capturing warm.
2. Apply Thermal Interface Material: Apply a thin , even layer of thermal paste to the rear of the thyristor disc. Cover the entire steel surface area thinly. If using a thermal pad, guarantee it’s the best dimension and density. Do not use way too much paste; excess paste crushes out and shields as opposed to performing warmth.
3. Setting the Disc: Thoroughly put the disc onto the heat sink installing location. Straighten it appropriately, making certain the mounting openings line up and the anode/cathode/gate terminals are oriented where you need them. Don’t slide it around as soon as the paste is applied.
4. Secure Mounting: Put the placing bolts via the disc and heat sink openings. Make use of any flat washers and springtime washers provided. Tighten the nuts or screws evenly and gradually . Use a cross-pattern tightening sequence like you would certainly with an auto wheel. Most essential step: tighten up to the supplier’s specified torque using a torque wrench. Overtightening cracks the disc ceramic. Undertightening fallen leaves spaces, triggering overheating. Torque specifications are not suggestions!
5. Make Electric Connections: Connect the anode, cathode, and gate leads using proper kinky terminals or soldering. Make sure connections are clean, tight, and protect. Path cords nicely, staying clear of sharp bends or tension on the terminals. Usage insulating sleeves if terminals are revealed. Double-check polarity!
6. Last Evaluation: Aesthetically check everything. Make certain no paste is smeared on terminals. Examine screws are tight (torqued). Confirm cables are protected and not pinched. Verify the warmth sink is properly mounted itself if needed (like with followers or in an air flow course).
4. Where You’ll Locate Thyristor Discs Doing the Hefty Lifting .
Thyristor discs are the muscular tissue behind numerous high-power control jobs. Look for them wherever you need specific changing of big currents. Electric motor speed controllers for commercial machinery usually rely upon them. They deal with the extreme power required to ramp large electric motors up or down efficiently. In power products, especially high-current DC ones, they work as durable rectifiers or controlled switches for voltage law. Temperature level control systems in huge commercial heating systems or stoves use thyristor discs to switch over burner on and off rapidly, maintaining an exact temperature level. Battery chargers, particularly for big lead-acid or lithium packs, use them for effective billing control. Also some sorts of lighting control, like high-intensity stage or commercial illumination dimmers, rely on thyristor discs to manage the power flow dependably. Their ability to handle high rise currents likewise makes them useful in protection circuits.
5. Thyristor Disc Installation FAQs .
Can I reuse an old disc? It’s risky. If the disc has been overheated or physically harmed, maybe deteriorated. Evaluate closely for cracks, discoloration, or thawed areas. If uncertain, change it. Do not reuse thermal paste; always use fresh.
What if I don’t have a torque wrench? Obtain one. Presuming torque is a significant reason for failure. Over-tightening cracks the disc. Under-tightening causes overheating. It’s important tools.
Is thermal paste definitely essential? Yes. Even apparently smooth steel surface areas have microscopic flaws. Thermal paste loads these voids, removing tiny air pockets that are horrible warmth conductors. Without it, the disc overheats fast.
Can I mount numerous discs on one warm sink? Typically of course, yet you need to check the warmth sink’s thermal capacity and the supplier’s standards. Guarantee there suffices spacing in between discs for air flow. Compute the total warmth lots to avoid overheating the sink itself.
What prevail failure signs? Evident physical damages, overheating (stained disc or heat sink), recurring procedure, inability to regulate the load, or a full brief circuit blowing integrates. Often traced back to poor setup or poor air conditioning.
(How To Install Thyristor Disc Type)
Why does the mounting torque issue a lot? The interior building of the disc relies on accurate pressure between layers. Correct torque ensures optimum warmth transfer from the silicon chip inside to the situation and afterwards to the warm sink. Incorrect torque breaks this important thermal path or physically damages the component.